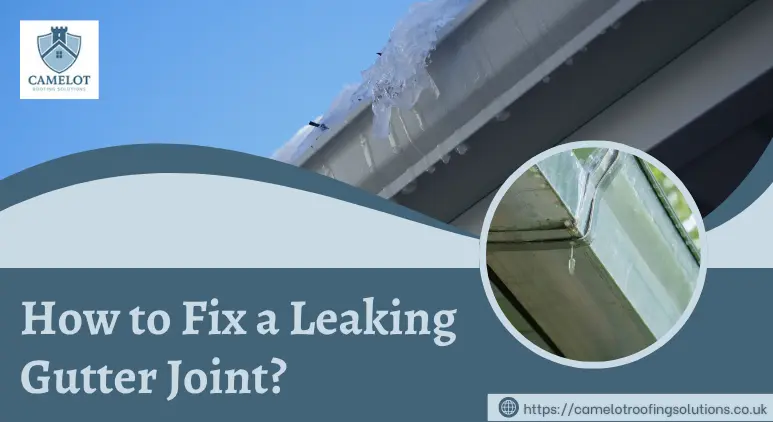
A leaking gutter joint is a common problem for UK homeowners due to constant rainfall and changing weather conditions. Even a small leak can lead to serious issues like damp walls, mould growth, and even structural damage if ignored.
This guide explains how to fix a leaking gutter joint in the UK using simple, effective steps. You’ll also learn the main causes of leaks, essential tools, maintenance tips, and when to call professional roofers in Hackney.
Common Causes of Leaking Gutter Joints
Before starting any repair, it’s important to understand the root causes of gutter joint leaking. Identifying the underlying issue ensures a long-lasting repair and helps prevent recurring problems, especially in the UK climate where gutters are constantly exposed to rain and temperature fluctuations.
- Degraded sealant: Mastic or rubber seals dry out, crack, and lose their waterproof ability over time
- Thermal expansion and contraction: Temperature changes cause gutters to expand and contract, loosening joints
- Debris and blockages: Leaves, moss, and dirt trap moisture, increasing pressure at joints. This is especially important for properties with flat roofs, where certain flat roof materials are more sensitive to standing water and overflow.
- Ageing gutter systems: Older systems (20–30 years) are more prone to leaks and wear
- Poor installation: Incorrectly fitted joints often fail prematurely
Essential Tools and Materials for Gutter Joint Repair
Having the right tools is essential for effectively fixing a leaking gutter joint:
- Sturdy ladder with stabiliser
- Protective gloves and safety goggles
- Waterproof gutter sealant (exterior-grade)
- Replacement rubber seals or joint connectors
- Screwdriver or drill
- Cleaning brush or gutter scoop
- Garden hose or bucket of water
How to Fix a Leaking Gutter Joint: Step-by-Step
Follow these proven steps carefully to repair leaking gutter joint safely and effectively while ensuring a long-lasting result.
Step 1: Prioritize Safety Before Starting
Before carrying out any gutter repair work, prioritising safety is essential, especially when working at height and handling tools in potentially wet conditions. Gutter maintenance often involves ladders, so taking proper precautions can significantly reduce the risk of accidents.
- Ensure your ladder is placed on firm, level, and stable ground to prevent slipping or shifting while you work
- Use a ladder stabiliser or support if available to improve balance and security
- Always check that the ladder is fully extended and locked in place before climbing
- Avoid working during rain, strong winds, or icy weather, as surfaces can become slippery and unsafe
- Wear appropriate protective gear such as non-slip footwear and durable gloves to maintain a firm grip and protect your hands
- If possible, have someone nearby to hold the ladder or assist you during the repair process
Taking the time to follow these safety precautions not only protects you from potential injuries but also allows you to work more confidently and efficiently while repairing leaking gutter joints.
Step 2: Thoroughly Clean the Gutter System
A clean gutter system is essential for accurate leak detection and effective gutter joint leak repair. Dirt, debris, and organic buildup can not only hide the exact source of the leak but also prevent sealants from bonding properly, reducing the durability of your repair, especially in UK weather conditions.
- Start by removing larger debris such as leaves, moss, twigs, and accumulated dirt from the gutter channel
- Use a gutter scoop, small brush, or gloved hands to safely clear out debris without damaging the gutter surface
- Work along the entire length of the gutter to ensure there are no hidden blockages that could cause future overflow
- Pay close attention to the gutter joint area, as debris often collects around connection points and contributes to leaks
- Once the visible debris is removed, flush the gutter using a garden hose to wash away smaller particles, sludge, and residual dirt
- Observe water flow during flushing to check for any additional blockages or drainage issues
Ensure that the area around the leaking joint is completely clean, dry, and free from any contaminants before proceeding to repair. Proper cleaning not only allows you to clearly identify the exact source of the leak but also ensures that gutter sealant adheres effectively, resulting in a stronger, longer-lasting repair.
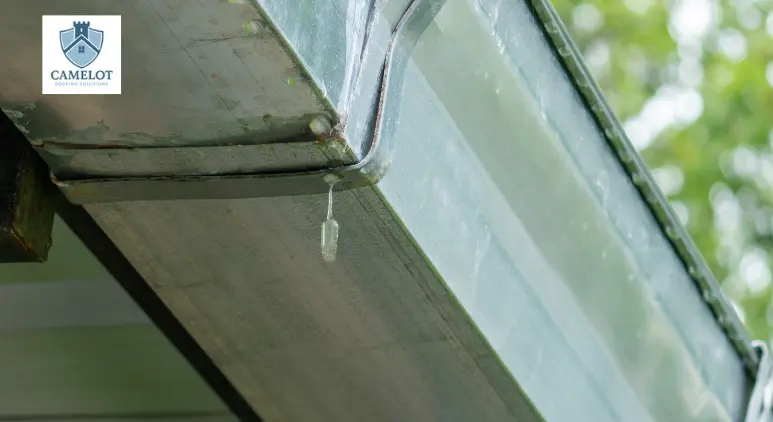
Step 3: Identify the Exact Source of the Leak
Accurately locating the source of the leak is crucial for applying the correct repair method and avoiding unnecessary work. In many cases, gutter leaks may appear to come from one area but actually originate from a nearby joint or blockage.
- Use a garden hose to run water through the gutter system in a controlled manner
- Observe the gutter joints carefully while water is flowing through the system
- Look for signs of dripping, water seepage, or visible gaps at the connection points
- Pay attention to how water behaves, whether it pools, overflows, or escapes at specific sections
- Mark or mentally note the exact leaking gutter joint for targeted repair
This step ensures you address the root cause of the leak rather than treating symptoms, resulting in a more effective, longer-lasting gutter joint leak repair. In some cases, the problem may not be limited to the gutter joint, especially if water has begun to affect surrounding roofing materials.
Water can travel along surfaces before becoming visible, which is why gutter issues are sometimes confused with roof leak problems.
Step 4: Inspect and Remove the Gutter Joint
Once the leaking section is identified, a detailed inspection of the gutter joint will help determine the severity of the issue and the appropriate repair approach.
- Carefully detach the gutter joint if it is designed to be removable
- Examine the rubber seals for signs of cracking, hardening, shrinkage, or wear
- Check for visible gaps, misalignment, or structural damage in the joint connection
- Remove any dirt, algae, or residue that may have accumulated around the joint area
- Inspect the surrounding gutter sections to ensure they are not damaged or warped
A thorough inspection helps you decide whether the joint can be repaired with cleaning and sealing or if it requires replacement for a permanent fix.
Step 5: Replace or Clean the Rubber Seal
The rubber seal plays a key role in maintaining a watertight connection between gutter sections. Over time, it can degrade due to exposure to weather conditions, making it a common cause of leaks.
- If the rubber seal is damaged, brittle, or no longer flexible, replace it with a new, compatible seal
- If the seal is still in good condition, clean it thoroughly to remove dirt, grime, and debris
- Ensure the seal is properly aligned and seated correctly within the joint housing
- Double-check that the seal fits tightly to create an effective waterproof barrier
A properly functioning seal significantly improves the performance of the gutter joint and helps prevent recurring leaks.
Step 6: Apply High-Quality Gutter Sealant
Applying a suitable gutter sealant strengthens the joint and helps eliminate any remaining gaps that may cause leaks.
- Use a high-quality, waterproof, and weather-resistant gutter sealant designed for exterior use in UK conditions
- Ensure the joint area is completely dry before applying the sealant for proper adhesion
- Apply the sealant evenly along the joint edges, focusing on any visible gaps or weak points
- Avoid over-application, but ensure full coverage without leaving air pockets or missed areas
- Smooth the sealant to create a neat, tight, and professional finish
Allow the sealant to cure according to the manufacturer’s instructions before exposing it to water.
Step 7: Refit and Secure the Gutter Joint
After sealing, the gutter joint must be reassembled correctly to ensure structural stability and proper water flow.
- Carefully align both gutter sections so they fit together precisely
- Reconnect the joint firmly into its original position
- Tighten any screws, clips, or fasteners securely if applicable
- Ensure the joint is stable, properly aligned, and free from movement or gaps
Proper refitting is essential to maintain the integrity of the gutter system and prevent future leaks caused by misalignment or loose connections.
Step 8: Test the Repair
The final step is to verify that the repair has been completed successfully and that the gutter joint is fully watertight.
- Run water through the gutter system using a hose
- Observe the repaired joint closely while water is flowing
- Check for any signs of dripping, seepage, or leakage
- Ensure that water flows smoothly through the gutter without escaping at the joint
If you are unsure about fixing a leaking gutter joint yourself or the issue seems more complex than expected, it’s always best to seek professional help. Contact our experienced roofers in Hackney who specialize in guttering services, inspections, and repairs. Our team can quickly diagnose the issue, provide reliable solutions, and ensure your gutter system is properly sealed and functioning efficiently.
Common Gutter Joint Repair Mistakes to Avoid
Avoid these to ensure long-term success when fix a leaking gutter joint:
- Applying sealant on wet or dirty surfaces
- Ignoring early signs of leaking gutter joints
- Using low-quality or incorrect sealant
- Not checking the entire gutter system
- Unsafe ladder use
- Ignoring Regular Maintenance
- Not Replacing Damaged Rubber Seals
- Skipping Gutter Cleaning Before Repair
Expert Tips to Prevent Leaking Gutter Joints in the UK
Preventing leaking gutter joints is just as important as repairing them. Regular maintenance and proactive care can significantly extend the lifespan of your gutter system, reduce the risk of water damage, and minimize the need for frequent repairs, especially in the UK’s unpredictable weather conditions.
1. Clean Gutters Regularly
Regular cleaning is one of the most effective ways to prevent blocked gutters and joint leaks.
- Clean your gutters at least twice a year, ideally during autumn and spring
- Remove leaves, moss, twigs, and debris that can obstruct water flow
- Pay special attention to joints and corners where buildup is common
- Ensure rainwater can flow freely through the entire system
Routine cleaning helps prevent overflow, reduces pressure on joints, and keeps your gutter system functioning efficiently.
2. Install Gutter Guards
Gutter guards are a practical solution to minimize debris accumulation.
- Prevent leaves, dirt, and debris from entering the gutter system
- Reduce the frequency of cleaning and maintenance
- Help maintain consistent water flow through the gutters
- Lower the chances of blockages that can lead to leaking gutter joints
Installing gutter guards is a long-term investment that improves gutter performance and reduces maintenance efforts.
3. Inspect Gutters After Heavy Rainfall
Post-rain inspections help detect issues early before they become serious problems.
- Check for signs of leakage, overflow, or dripping at joints
- Look for misaligned sections or loose connections
- Identify any blockages that may have formed during heavy rain
- Address minor issues immediately to avoid costly repairs later
Early detection plays a key role in preventing structural damage and maintaining a reliable gutter drainage system. On pitched roofs, overflowing gutters can allow water to reach areas beneath tiles, so understanding the different types of roof tiles in the UK can help identify potential weak points.
4. Schedule Annual Maintenance
Regular professional maintenance ensures your gutter system remains in optimal condition.
- Arrange a yearly inspection by experienced professionals
- Identify hidden issues such as seal deterioration or joint weakness
- Perform timely repairs and adjustments as needed
- Extend the overall lifespan of your guttering system
When to Call a Professional Guttering Specialist
If the issue goes beyond basic DIY repair or you’re unable to safely access or properly identify the cause of the gutter joint leaks, it’s a good idea to seek expert support. Complex gutter problems, multiple leaking joints, or structural damage often require professional tools and experience to ensure a long-lasting fix. If multiple joints are leaking or damage is widespread, it may be worth comparing repair work with roof replacement costs in the UK before proceeding.
For homeowners who want a reliable and stress-free solution, contact our experienced roofing contractors in London who specialize in guttering services can help ensure accurate inspection, proper repair, and prevention of future leaks. Professional assistance not only saves time but also helps avoid recurring issues and potential water damage to your property.
Conclusion
Fixing a leaking gutter joint in the UK is manageable with the right tools, proper cleaning, and careful sealing. Addressing issues early helps prevent damp, mold, and structural damage, while regular maintenance keeps your gutter system working efficiently year-round.
For complex leaks, multiple damaged joints, or hard-to-reach areas, it’s best to seek help from professional roofers in Hackney who can ensure safe, accurate, and long-lasting gutter repairs.
FAQs
What is the best sealant for leaking gutter joints?
A high-quality waterproof exterior gutter sealant designed for PVC or metal gutters is best. It provides strong adhesion, flexibility, and long-lasting resistance to rain and weather.
How do you fix a leaky downpipe joint?
Clean the joint, replace any damaged rubber seal, apply a waterproof sealant, reconnect the joint securely, and test with water to ensure no leaks remain.
Can I use silicone to seal gutter seams?
Yes, but it is not always ideal. Silicone may not bond well long-term, so a dedicated gutter sealant is recommended for better durability and performance.
When should you not use silicone sealant?
Avoid silicone on wet or dirty surfaces, in high-pressure areas, or for long-term gutter repairs, as it may not provide a strong or lasting seal.